Monday 27 September 2010

Interim Show

ok, So the show has come and gone and despite a low turnout from both exhibitors and visitors I still like what I did! I was quite pleased at how it all looked considering I threw it together in about an hour and didn't use a spirit level to stick up my sheets!
I took up two boards at just over a metre each, this was on the right board
This was on the left board. The sheets up behind were cut from this blog, it was a quick outline as to how I'd got to where I am now.
This is a rather blurry photo. I put the cubes over the warrior cape to cover up the 'lowness' of the cape! I don't think it looks bad either! and at the show in a bit more open atmosphere, they looked quite ok!
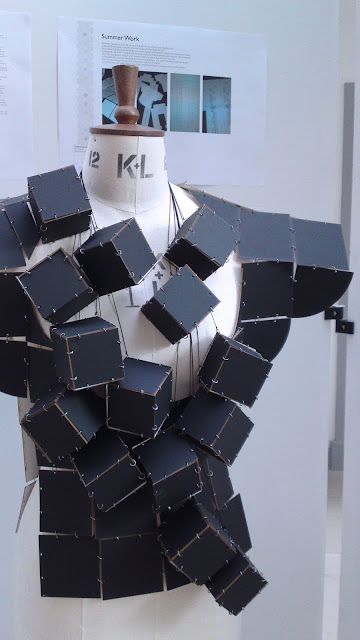
The shoulders looked ace though. I really feel as though they are the best piece. They are quite engaging through their patterns and are different. A lot of people complimented them and even my mum said they looked like lace which is where they were inspired from so I was pleased!
I think they should be made a tad bigger for a better scale and statement, these could be a little drowned if they were on a big time photo shoot (dreaming!). The top edges need sorting, one is seamed better than the other but I know this for next time. And the top edges near the seam needs covering up to hide the stitching of the pieces.
I think they work the best because they've been in my head the longest, they've been visualised and pondered about for months so I knew them as I was making them.


Tuesday 21 September 2010

Shoulders

I never kept up with the shoulder pads idea so much because I was fairly sure it wold work so I just got on with it.I designed the shapes, and covered the shoulder pads in black fabric.
I made two designs intending to mix the two and I made two extra of each shape (which turned out to be handy).
One shape is the basic spider stitch from lace but is quite a recognised pattern anyway and the other a floral one I quickly made for a square, I just doubled it over to make a quick idea which I do like and hopefully will re order it so it's better.
I stitched on the pieces according to below (this started off pretty scrawled as I did it on the mannequin opposite a mock up.


Cuboid

The cubes were built at 8cm. I doubled up some of the squares to replicate a 2-3 mm acrylic rather than a 1.5mm card that when built up is quite loose. I eventually tightened all the jump rings to hold the cubes together better.
They are very much a last minute bash at something I don't intend to cover in this collection but it's played on my mind so I've had a go.
Because it's so early on in the thought process I didn't really know how to sample them so I just threw them on the form in different ways to see what happened.


I kind of like the idea of having a couple on a chain round the neck, maybe tied, maybe not so although it's a random picture, think of the cubes on something that goes round the neck. I think they would be better a little smaller.

I think you could get into making hundreds of these of different sizes to go over the top with this. It's also something that can restrict movement although anything you wear changes your behaviour and how to move. Again, these ideas are only the show piece!

Japanese Warrior

The next cape has many nicknames, at the moment it's the warrior cape.
Taking what I'd figured from the early squares and taking into account the cut sample will be more rigid, I didn't realise the sample would fit like this. Maybe it's ok (any suggestions?) but I like the shoulders and how broad they are and I love how the bottom part hugs the figure on the front and back.
At the front I didn't bargain for the collar to go so low! you'd have to wear something underneath to keep your modesty (if you're a woman who intend to wear this! I'm not going to say any of what I make is specifically for women). But if this was used eg on a photoshoot then I don't see any reason why the model couldn't be a bit nude up top or bottom if so needed! Other than that I kind of like the way the neckline comes so low and hugs the form. It would open up the way for a killer statement necklace to go in that void.

The back looks brilliant, and really shows off the shape of the shoulders. There is movement like on the octo cape but not as much and because there is no detail yet it doesn't show. plus what stands out more is how the piece stands on its own off the shoulders.
This piece really does hark back to my Royal Armouries visit and shows off a definite Japanese feel (it was suggested when I went into uni)

I then started messing with the cubes I'd made filling that void with them but I'm not sure seeing them like this. I'd prefer the cubes to have detail, and be a very different colour opposed to the cape. Or making the cubes out of the octagons? A few ideas. Anyhow, I might show the pieces like this to save space at the interim show.

Octocape

I had to re-order jump rings to connect all the pieces I needed so many. But eventually I linked all the pieces together, the capes were quicker, taking a few hours but the cubes took nearly two days!
I took it all into uni to pop them back on the mannequin to see how they looked
Octo cape as I've been nicknaming it looks ok, I've decided that I'd prefer this just in octagons, with no detail on the back. The detail is too fine, it doesn't stand out enough, I doubt it would even stand out if I used the bigger squares putting one of the other ideas under threat!
I like how it sits at the front but at the back it's tricky, from far off it looks ok but it looks misshapen up close. The more I look at this picture the more I can see the design flaring out from that flower in the bottom right corner. The mix of squares dropping into octagons doesn't work.
It is also questionable if it needs some kind of fastener, I prefer it like this, just draped, and I've tried it on myself and it stays on easier. This like the others so far is just a showpiece, not something to be worn every day.

Cut cut cut

Two days were needed to cut what my designs, the lovely guys in product cut some for me too because I was pushed for time on one day- when up there I noticed a mini leaf of mine from last term, I think they cut an extra one in mini for themselves which I thought was cute and gave me a little tiny bit of confidence!
Because I was cutting on black is was tricky to see what was going on! or photograph it!
It's been one of the first times what I have done have been cut cleanly so when I pull out the board all the design is left on the bed! It looked nice at the time!
I'm cutting the designs onto board because it is only a test to see what works and what doesn't and it is much cheaper than acrylic!

Paper Squares

At home, I began to stick the squares together to see what I was playing with

I then built tiny scale versions, cutting in ideas and possible designs

From there I marked out the diagrams of the models and started to play with the pattern inside. Eventually I decided to only finish the pattern for the bottom design and leave the top as squares.
I love the top design, maybe a bit 'Superwoman' in places but overall I'm a fan.
I quite like the octagons that help form the second design, it is quite in keeping with the design ideas I'm working from and has a basic lace stitch at it's heart.


I printed out some of the diagrams of the completed designs to help me piece it all together!

Summer Break

Over the summer I've definitely had a break where I have done nothing! But I have also started to work on what I hope will be more of a showpiece to the collection that will, for the time being, become what I will show at the interim show coming up quickly!

So I went to uni to use one of the model forms to measure out what sizes I have to play with. I know I want to try and use squares (they gave me the basic shape) so I sat and cut hundreds of squares in different sizes ready for uni and I also bought some shoulder pads that would form the base of one of the ideas.

I used the squares to see how it would all lie on the form. I intend for the squares in the long run to be in acrylic so I know that it won't be as flexible further down the line. I cut three different sizes but felt pretty immediately as though the two largest squares worked the best- 6 and 8cm.
Next up I pinned on the shoulder pads the other way round and attached the squares. I had tried laying them out at home but it came together brilliantly first try and is what I've kept with so far.


So with that I could go home and draw out patterns knowing how many squares I needed to cover a torso, over the shoulders, under the arms etc (I never did fashion cutting, this is all beginners behaviour- any advice from fashion studentes appreciated!)
Then I could start to set out designs for the laser cutter.

Aller!

So here I am, just heading into my final phase of my textiles MA. I thought I'd try and run a more professional blog based around my work in this term and hopefully beyond.
My work has taken a huge turn since my degree and I'm hoping to create something that I can sell rather than feel at a loss with. All year I've been using the more fashion/trend based influences I've developed since before I started my MA; I tend to prefer the pretty rather than anything else these days.
I have been developing patterns and designs from old lace and mixing it with old postcards from my great grandma as well as florals and other happy memories to make laser cut acrylic jewellery. So far I've been happy with my progression and now it's time to 'make it work'.
In theory terms, I've been taken back through my monograph to look at the line. It is something I am massively interested in, how it can be moved and made into something, and how we get it there, our movements, what it tells you, what it tells you about me, it's language, the other language I use.

I'm going to post more about my work here, occasionally I may post something that I am simply crackers about, other than that nip to my tumblr which is my oldest-and-very-visual-inspired-and-full-of-great-images blog!

If you're reading this then thankyou xx